Building A Zero-Data Model Foundry in Under an Hour
For anyone building AI-powered applications, time to market is critical. With new models and products announced every day, startups and enterprise applications providers alike do not want be playing catch up for too long.
But turning an AI concept to reality can be a daunting task. Developers want to shorten the time for model training, fine-tuning, and benchmarking, and deliver superior end user experience when serving models by utilizing GPUs, but leveraging accelerated compute infrastructure often requires skilled engineers with expertise in advanced cloud compute. And that’s even if they have access to advanced hardware, such as Nvidia H100 GPUs, which are a scarce commodity. Finally, even after organizations solve the problem of availability of hardware and human resources, deployment and operations are time-consuming processes using traditional tools.
In this blog, we will see how the Covalent Cloud platform accelerates the development of AI and accelerated compute applications by making it incredibly easy for developers to run serverless GPUs and infrastructure by employing powerful abstractions in their code. To illustrate, we will build and deploy the entire functional AI backend for a SaaS application – our “zero-data model foundry” – in Covalent Cloud, using nothing but our local Python environment, and skip (at least) 13 typical deployment steps along the way. Let’s dive right in!
Why Covalent Cloud
Built on an open-source core, the Covalent Cloud platform is designed specifically for AI and other compute-intensive applications. It provides an intuitive developer experience for defining (and executing) high-compute code from local Python environments or Jupyter Notebooks. The key benefits include:
- Minimal Learning Curve – Covalent Cloud relies on additive changes to ordinary Python code. Users don’t need Kubernetes, Terraform, or Docker to architect and deliver your software.
- Serverless Computing – Users don’t need to manage the compute infrastructure that orchestrates the execution of their code. It is completely separate from the business logic. Every individual task or service in Covalent can use its own set of resources to optimize for efficiency.
- Faster Time to Market – Simply put, code that’s easy to write is faster to write. Covalent Cloud guarantees this by providing powerful abstractions within a consolidated software environment and orchestrates the infrastructure for users.
- Easy Scalability – Scaling backend resources is virtually effortless – managing compute is our speciality!
What is a Zero-Data Model Foundry?
By “model foundry,” we refer to an application that automatically creates custom machine learning models. “Zero-data” simply means that users do not need to provide data or even point to existing data for fine-tuning models — in fact, our application will use an LLM here to automatically generate fine-tuning data instead!
For our zero-data model foundry, the input will be a text prompt sent to a hosted service, and the output will be an LLM fine-tuned to the input prompt requirement, which will also be hosted as a service accessible by an HTTPS endpoint.
👉 We’ll build the entire model foundry as a SaaS platform on top of Covalent Cloud!
Zero-Data Model Foundry with Covalent Cloud
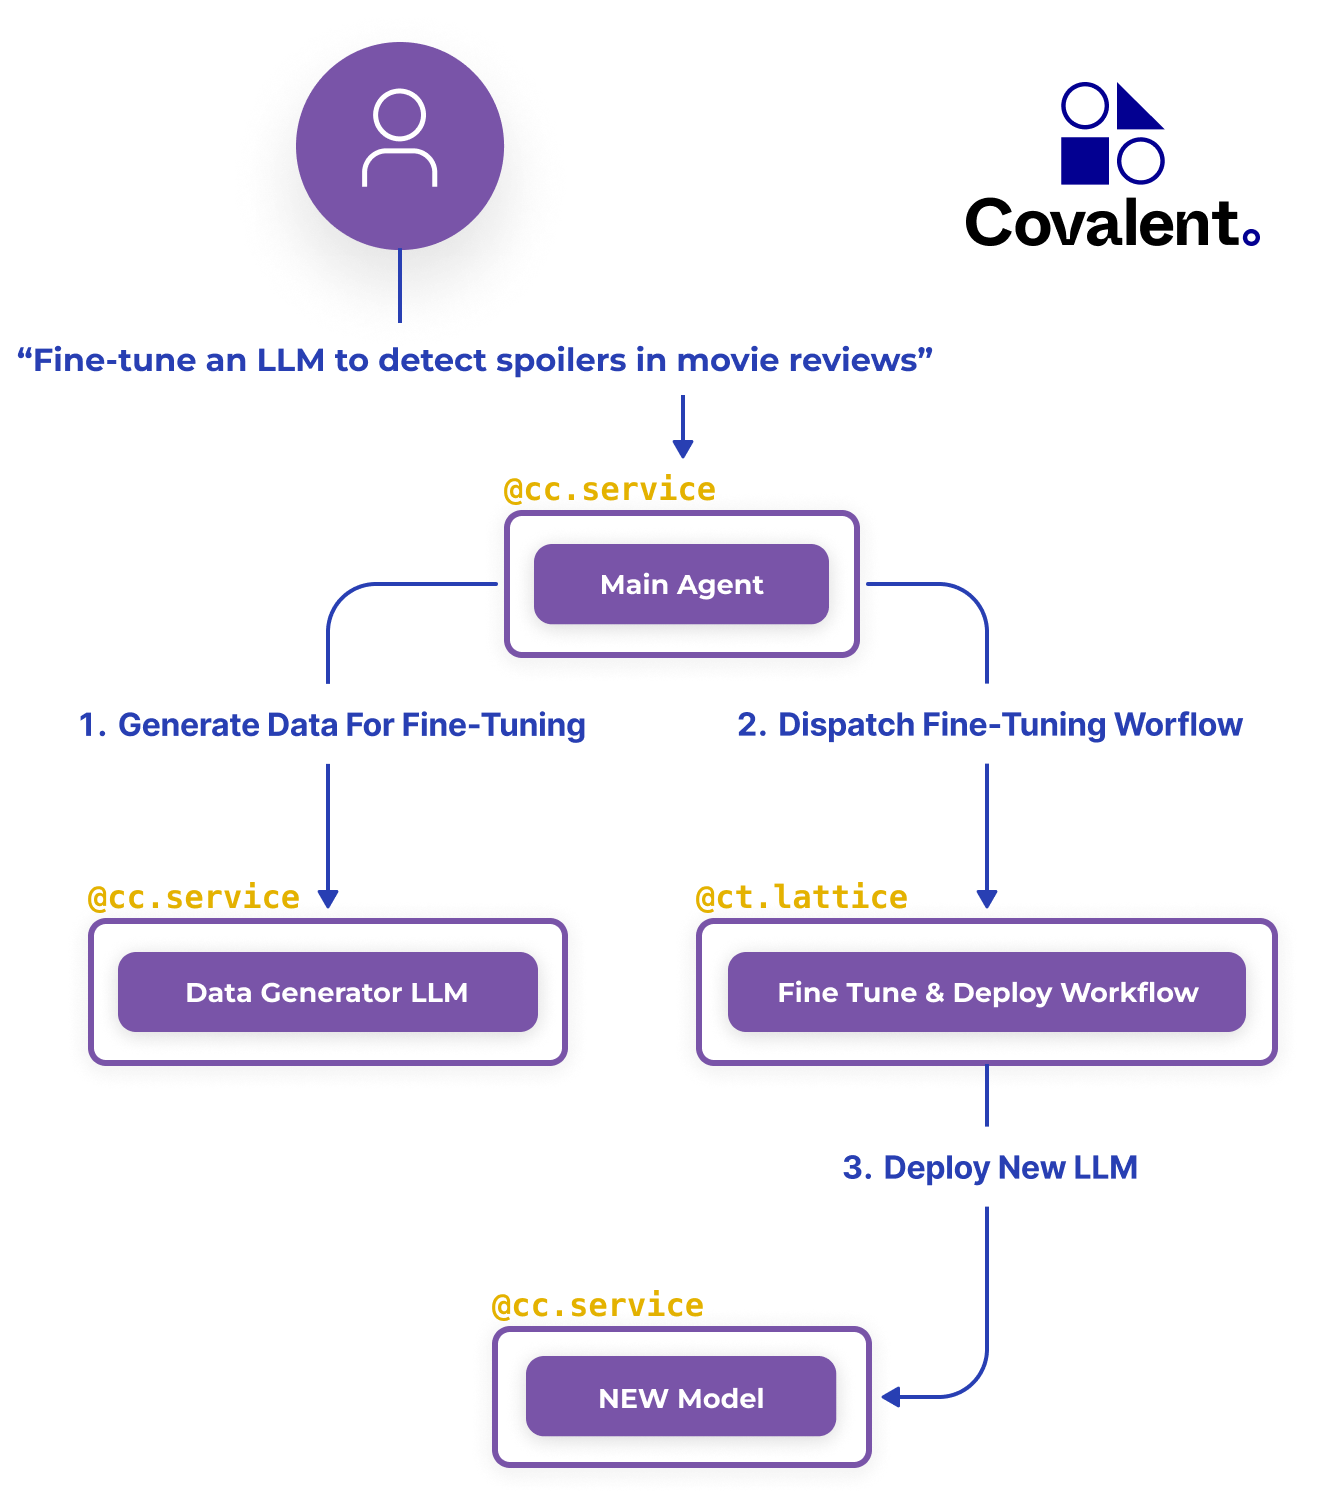
The foundry’s process flow is visualized in the diagram below. As we’ll see shortly, Covalent lets us design and implement this application directly in terms of these high-level components.

Above, we outline the following procedure. First, end-users submit a task description, e.g. the string “Fine-tune an LLM to detect spoilers in movie reviews”. The foundry then proceeds with:
- Generating data for fine-tuning a new LLM, based on the task description.
- Dispatching a Covalent workflow to do the fine-tuning.
- Deploying the new LLM for real-time inference.
In Covalent Cloud, we build this platform by writing functions that simply do the above. We’ll use ordinary pip installed packages and write ordinary code, letting Covalent take care of the rest.
What It Takes to Do This Without Covalent
Let’s discuss what it takes to create a model foundry like this without Covalent Cloud.
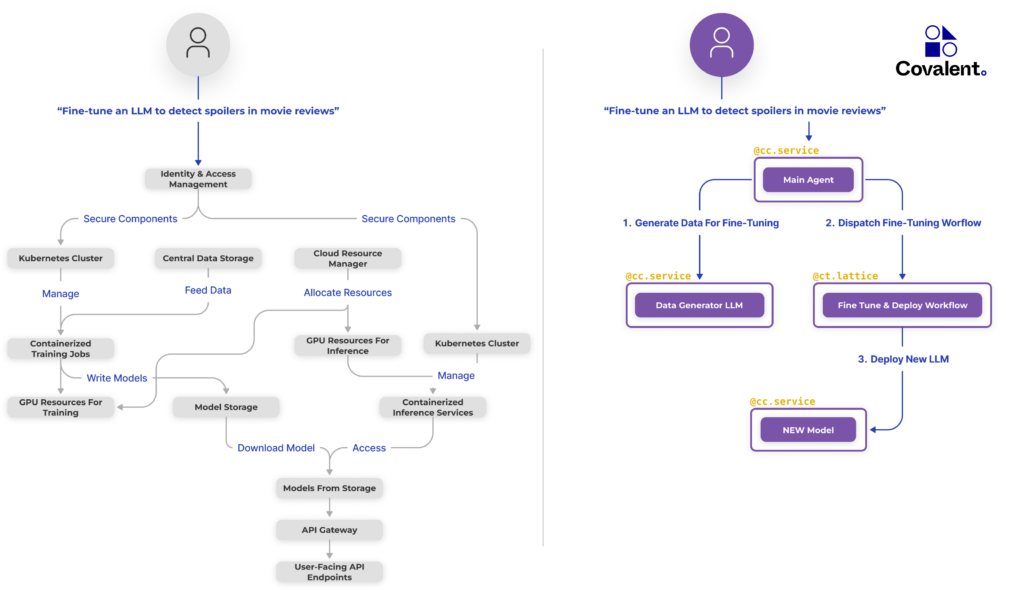
To fully appreciate the difference between creating our application with and without Covalent, consider that, despite the already apparent complexity shown on the left side below (without Covalent), each of the more than a dozen individual infrastructure components on the left is itself a high-level abstraction. Indeed, this diagram is arguably generous with respect to the traditional approach. Without Covalent, even if we deploy every component, we still have to configure the networking that interconnects them.

Consider also the skillset required here. If we were NOT using Covalent Cloud, we’d need to:
- implement IAM across the board
- either learn Kubernetes for GPUs or hire/find someone who already does
- either learn Distributed Docker or hire/find someone who already does
- subscribe to a cloud provider with ample GPU capacity
- containerize various components (and configure a private registry to store their images)
- configure an object store for the generated data and the fine-tuned model files
- configure an API gateway and safely expose it to the end-user
The list goes on… By contrast, Covalent Cloud guarantees all this out of the box!
Everything that we do when using Covalent Cloud represents at most a tiny subset of what’s required with traditional tooling. In the next section, we’ll see how easy this really is.
Developing on Covalent Cloud
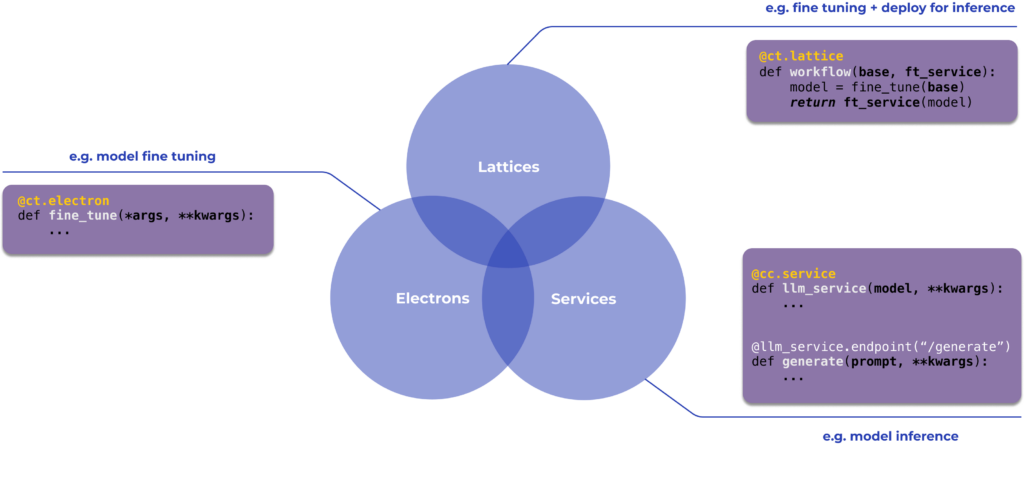
Notice the two types of decorators found on top of outlined components in the previous figure: @cc.service and @ct.lattice. Together with @ct.electron, these decorators represent the main building blocks in the Covalent Cloud SDK.
We’ll use them to create long-running services and executable workflows in Covalent Cloud.

As usual with decorators in Python, @cc.service and @ct.lattice wrap a function to modify or add to its existing functionality.
☁️ We can convert almost any function into a cloud-executable task or a long-running service by adding decorators from the Covalent Cloud SDK.
Let’s take a closer look at what will comprise our model foundry.
The Main Agent
As the orchestrator of our model foundry, the Main Agent handles user requests to initiate data generation and dispatch fine-tuning workflows. It is a CPU-bound service with no high compute requirement.
The Data Generator LLM Service
Synthetic data generation is the critical first step in our model foundry. This is the step that enables “zero-data” fine-tuning. Below is an abridged version of the code that defines this service, along with its one API endpoint (effectively POST /generate-data).
data_generator_ex = cc.CloudExecutor(  # assignable compute resources
    env=DATA_ENV,
    num_cpus=6,
    num_gpus=1,
    gpu_type=GPU_TYPE.H100,
    memory="48GB",
    time_limit="7 hours",
)


@cc.service(executor=data_generator_ex)  # initialize service
def llm_data_generator(model_name):

    """Initialize the service that host the data generator LLM"""

    from vllm import LLM

    return {"llm": LLM(model=model_name, trust_remote_code=True)}


@llm_data_generator.endpoint("/generate-data")  # define an endpoint
def generate_data(llm, task):

    """Endpoint to generate data using the LLM"""

    # Format task into prompt
    # Create a batch of prompts and sampling params
    # Generate data
    # Extract and filter generated data

		...

    return data_items
The body of the generate_data() function, which we’ve omitted here for brevity, is normal code that utilizes the particular LLM library (vLLM). You can see our source code here for the full version.
The reason why this component is implemented as a service, as opposed to a lattice/workflow, is because the initialization step is time-consuming. Loading an LLM into vRAM can itself take several seconds, never mind downloading the model files in the first place.
When this is done inside a service initializer, it only happens once.
The Fine-Tuning Workflow
Unlike services, workflows in Covalent start from scratch and release all their resources once execution is finished. Workflows (i.e. lattices) **are composed of services and/or tasks (i.e. electrons).
For example, our fine-tuning workflow is defined by the simple function below.
cpu_ex = cc.CloudExecutor(env=FT_ENV, num_cpus=12, memory="12GB")


@ct.lattice(executor=cpu_ex, workflow_executor=cpu_ex)
def finetune_workflow(model_id, data_path, llm_service):

    """Run fine tuning, then deploy the fine tuned model."""

    ft_model_path = fine_tune_model_peft(model_id, data_path)
    service_info = llm_service(ft_model_path)

    return service_info
Here, fine_tune_model_peft() is an task that downloads the model, uses PEFT to quickly fine-tune it, and saves the fine-tuned model to a cloud storage volume in Covalent Cloud.
Notice how, compared to the data generation service, this workflow runs in a completely different environment. We can do this because environments, like compute resources, are fully modular in Covalent.
The only other thing inside the above workflow, llm_service(), deploys the fine-tuned model for inference, as a long-running service. As always, we’re free to specify different compute resources (and a different environment) for this service — indeed we do!
Check out the complete implementation for specifics.
The Fine-Tuned Model Service
This is another service that runs in Covalent Cloud. It’s not a part of our “model foundry” per se. Rather, it’s the output — the final fine-tuned model — that’s returned to the end-user.
The model foundry uses this service definition to deploy LLMs that are fine-tuned according to the user’s task description.
The initializer and /generate API endpoint are defined as follows. (In the full code, we also define a bonus streaming endpoint that yields a token-by-token response.)
ft_service_ex = cc.CloudExecutor(
    env=FT_ENV,
    num_cpus=25,
    num_gpus=1,
    gpu_type=GPU_TYPE.L40,
    memory="48GB",
    time_limit="7 hours"
)


@cc.service(executor=ft_service_ex, volume=volume)
def finetuned_llm_service(ft_model_path):

    """Serves a newly fine-tuned LLM for text generation."""

    # Load and configure saved model
    # Load and configure tokenizer
    # Combine model and tokenizer into a pipeline

    ...

    pipe = pipeline("text-generation", model=model, tokenizer=tokenizer)

    return {"pipe": pipe, "model": model, "tokenizer": tokenizer}


@finetuned_llm_service.endpoint("/generate")
def generate_text(pipe, prompt, max_length=100):

    """Generate text from a prompt using the fine-tuned language model."""

    output = pipe(
        prompt, truncation=True, max_length=max_length, num_return_sequences=1
    )
    return output[0]["generated_text"]
Using The Model Foundry
What we see above is almost all there is to it — some standard code for AI/ML, plus a few decorators and metadata about resources.
Once the model foundry is defined, Covalent steps in to do all the plumbing underneath.
Invoking the service means calling a POST /submit endpoint defined in the Main Agent API. (You can see how that’s implemented here.)
Here’s what task submission looks like when using the built-in Python client for the Main Agent.
# Initiate the zero-data model foundry.

task = "Fine-tuning an LLM to detect spoilers in movie reviews."
for k in main_agent.submit(task=task, min_new_examples=3000):
    print(k.decode(), end="")  # stream response
Generating fine-tuning data ...
Generated 3014 total examples
Saving dataset at /volumes/model-storage/data_3014-a804ac4f-3b7d-4b61-8857-6e90ec6419a8
Dispatching fine-tuning workflow
Dispatch ID:
bb8c0ae6-6584-499b-89c1-e862ddb69239
Fine tuning new model ...
New Service ID: 664610f3f7d37dbf2a4689cfEnd-users can then load their own client for their custom LLM by referring to its unique service ID.
import covalent_cloud as cc

spoiler_detector = cc.get_deployment("664610f3f7d37dbf2a4689cf")
Here’s a sample of how that might be used.
import covalent_cloud as cc

spoiler_detector = cc.get_deployment("664610f3f7d37dbf2a4689cf")
Here’s a sample of how that might be used.
spoiler_detector.generate(
    prompt=(
        "This ripping action-adventure features stellar effects and a "
        "superb lead performance from Owen Teague as a timid simian "
        "who must rescue his clan from the clutches of a warlike tribe. ##"
    )
).split("##")[-1].strip()

# Review of Kingdom of the Planet of the Apes (2024). Scored 90/100. [source: Metacritic]
NO SPOILERSummary
In this blog, we used Covalent Cloud to create a scalable production ready zero-data model foundry that fine-tunes and deploys specialized LLMs, based on natural language prompts sent through a user-facing API.
We did this entirely within a single Jupyter notebook! No Docker. No Kubernetes nor Terraform. No manual networking.
A major advantage of this accelerated approach is that additions and modifications are much easier to make. When using Covalent Cloud, our infrastructure is defined as Python code, so it scales accordingly. If we need a new component, we simply add a new function. If we need more compute, we simply swap our executors.
This dynamism makes Covalent Cloud an ideal platform for small teams and startups looking to rapidly deploy and iterate upon AI-driven applications. It’s astonishingly easy to use and a reliable point of access to state-of-the-art hardware, like NVIDIA A100/H100 GPUs.
Covalent supports both complex workflows and long-running services, like those that comprised our model foundry. It also guarantees a time- and cost-efficient implementation, allowing you to tailor allotted compute resources on a task-by-task basis. Just take some Python code, add a handful of decorators, and you’re good to go!
To learn more, sign up to try Covalent Cloud today or explore our documentation for many more examples.
Stay tuned for more blog posts that showcase the power of Covalent Cloud!